Sunday, April 25, 2010

Culinary Experiment


Disclaimer: I am not a chef.
I repeat - I am not a chef. I'm not even a cook. In fact we have something in my house called find your own dinner night... and it happens more often than I should probably admit to people like... my mother, or... child protective services.
But there it is. It happens. Often.
Anyway, when I do provide my family with home cooked sustenence, I actually try to pack in as much nutrition as possible,
(to make up for the night of corn flakes and pickles)
which often leads to some interesting experiments.
I'm calling this one Sweet Potato Puff Cookies
but don't let the name turn you off... despite the low sugar, low fat, veggie content, they were actually scarfed down by the lil'uns so fast that I never got my finished product photo.
I started with one cup of roasted sweet potato,


mashed with four tablespoons of melted butter, a quarter cup of skim milk, and one large egg.
Then stirred in one and a half cups of flour, two teaspoons of baking powder, half a teaspoon of salt, and four packets of Truvia (a natural stevia plant sweetener)


You could use a quarter cup of sugar instead of the Truvia, but i was going for low-cal.
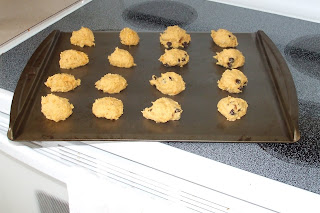
Now at this point I scooped a few cookies out to see how the "plain" variety went over, before adding a quarter cup of chopped pecans and a half cup of chocolate chips.


Bake on a greased cookie sheet at 375 for fifteen minutes.
I used my medium scoop (average drop cookie size) and got 22 cookies.
They turned out to be light and fluffy almost dinner roll texture, but sweet and yummy, eaten by even the four year old who was quick to proclaim "but I don't like potater cookies!" while I was mixing the batter.
Apparently potater cookies are quite acceptable when they come with chocolate chips.
Oh and the "plain" variety...
was very bread like, and though I didn't mind them, were quickly gobbed with chocolate by the nine year old. So much for the healthy part!


So there go, we survived them. And, just in case any of you are daring enough to risk it, here's the official conglomerate:
1 C cooked sweet potato
4 Tbls. melted butter
1/4 C milk
1 egg
1 1/2 C flour
2 Tsp. baking powder
4 packets Truvia or 1/4 C sugar
1/2 Tsp. salt
1/4 C pecans
1/2 C chocolate chips
Bake on greased cookie sheet @ 375 for 15 minutes

And remember: I am not responsible for any kitchen mishaps or husband's complaints. 


Tuesday, April 20, 2010

Not Just A Memo Board


I was all gung-ho with decorating my little man's room when the girly-o's got jealous and managed to distract me,
(surprise surpise)
with a project for their room.


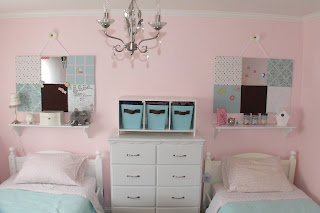
We had talked for a while about finding some sort of large memo boards for their wall that they could use to hang up all the guck they find most important to keep and display... like an old Valentine or a particularly beautiful gum wrapper.


But I had visions of it being more than just your standard tuck-stuff-in-ribbons type of board. I wanted a dry erase area and a magnet area as well as the typical cork... and of course it had to be girly, but not too girly.
We started at the fabric store...


and found five fabrics that we all three agreed upon.
(Now, doesn't that sound simple?)
Maybe I should say - after four stores and much debate as to why faux fur would be inappropriate for the application... and several lessons on what constitutes 'clashing'... we actually found five we allllll liked. Whew!

Ok, the next step was easy. Cork is sold in 12 x 12 sheets,
(I never knew, did you?)
and is rather cheap at that... now if only I could think of other things to do with it... cozy basement flooring?
Maybe not.
We cut the fabrics just large enough to wrap aound the sides and hot glue down.
Turns out the girly-o's find hot glueing amazingly fun.


As in would not let me touch the glue gun fun.
So I let them take over and I sat back with my camera.


We (they) tucked the corners in, and pulled the fabric tight around the cork. Then I glued each square onto a huge foam core board from Hobby Lobby.
When it came to the actual assembly part, the glue gun had magically lost its fun, and I was suddenlly on my own again. Thus, no pictures. 
They each chose ribbons to glue on a square for the tuck-in type of display, and left a square or two blank for stickers. We are still searching for pretty push pins to use on them, too. For the wipe-off area we used a 12 x 12 plastic sheet protector glued in with the edges tucked under the cork boards and the open top on the side so they can change out the papers or fabrics inside. For the Magnet area we used sheet metal from Home Depot,
(again with the edges tucked under the cork boards)  
and to hang them, I sandwiched ribbon between the cork boards and foam core backing with extra glue...
voila.


Oh, but wait! We need two...


Ok repeat the process, and.... there.


Two custom memo boards, and two happy girli-o's.
Now what was I doing before they conned me into this endeavor?

Monday, April 19, 2010

For The Love Of Spray Paint

I've recently discovered the true meaning of joy.
It comes in a can and costs about two-ninety-eight.
Spray Paint, ahhhh the glory of instant gratification!
 For a person seriously lacking in the patience department, this little gem is a miracle with a nozzel.
Case in point:
I've been searching for a tray large enough to carry goodies for my family of five downstairs on movie night, but pretty enough to sit on my counter while not in use, since my tiny house was built with only enough cabinets for the most crucial of items.
The day after I nearly broke down and spent 34.99 on tray in Pier One, I found this little gem in a thrift shop for .49 (Hmmm... Interesting. My keyoard does not have the little cent symbol. Does yours?)
Sorry A.D.D.
Anyway, I brought it home, dug out a can of off white and a can of clear gloss and fifteen minutes later, ta-da!


Don't you love instant gratification!
Then there was this little basket, which I liked for a bit in the living room... 
 

But after a fifteen minute make-over is creamy-licious in my kitchen...

I didn't even get side-tracked with another project in the process!
And, let's not forget how it recently saved me over $350 in new door hardware...

Knobs, hinges, strike plates... all in oil rubbed bronze. No more shiny fake brass for me!
I have realized the key to spray paint success (or any paint really) lies in the clear coat. A couple coats of the clear stuff makes a beatuful hard finish that is scrubbable. And with three young kids, everything has to be scrubbable!
Ohhhh, yes, I could really get carried away with this stuff...

Saturday, April 17, 2010

A gardener, I am not.

Every spring it's the same.
I start with the magazines... the beautiful pictures of brick, stone,
and green, green, green,
(like this one from Redwood Hollow Guest Cottages)

with lovely foliage and flowers abound, in charming colors that make a young girl's fancy
(okay, maybe not that young)
turn to garden plans and farmer's tans.
I run to my favorite garden centers and walk among the fresh, bountiful plants all sitting with their promise of backyard beauty hanging on their little plastic tags.
I line them up and group them together and stand back to squint at them with my 'seasoned eye'
(as if I had one)
and make my purchases with hope and hapiness of my future backyard bliss.
But then I get home,
and I walk around my backyard,
and I remember that all those lovely little promises I brought home last year have withered and died under my care...
because I am noooo gardener.
Luckily I have one under my employ...


and he works pretty cheap.


Though I'm not enirely sure of his credentials...
or his methods.


He might even take after his mother.
But, I do adore him, so until the day I can afford a hot latino named Pedro who adores painting my toenails and rubbing suntan oil on my back during his breaks by the pool, before I invite him inside for iced tea and he purrrs in his hot little accent,
"well, if you arrrre  surrrre your husband wouldn't mind..." 
But, I digress,
Luckily, the local garden centers have a one year guarantee


so we just leave the tags on. It makes it easier.
Trust me.
To survive in my yard you have to be tough...
strong...


and determined to live...
with hap-hazard pruning...
and schnoodle attacks...

and without water.


(unless you happen to be the patio)
So when I walk around my yard and find little signs of life,


specimens that actually lived up to their promise,


despite my attempts to kill them with neglet...
Well, now that just inspires me to go shopping.


Besides.... the guy who helps me out with them,
his name is Pedro.
(I know!)

Thursday, April 8, 2010

A Bathroom Project

I am reminded of a children's rhyme as I think about this particular project, but I can't exactly think of what it is... something like this is the house that John built or maybe it was something about a bump on a log...
If I had more initiative, I would look it up and find out what I'm talking about, but I'm just not that ambitious.
The point is it was one of those things that started small and grew.
And I mean GREW.
It all started in my favorite antique shop when I found these little lovelies,
I happen to be in an aqua phase.
And a zinc phase.
And they were only $4 a piece.
So I bought them intending to use them for kitchen storage, sugar, corn starch, tea bags... it didn't really matter that I already have storage for all of those things, these were too beautiful to pass up. Then I got them home and realized how gorgeous they looked with the new rug I had recently bought for the bathroom. So instead of the kitchen they found a home here,
And I immediately chucked the old containers that stored the soaps, swabs, and cotton balls so it looked like i needed them after all ;-)
The only problem was the serious lack of aqua elsewhere in the room (other than the rug) 
Hmmmm...
Quick solution - chuck the old prints in the photo frame towel rack and print out ones with aqua backgrounds, and voila,
 And it only took me four hours of internet searching to discover there were no free graghic prints with aqua backgrounds... luckily I had some scrapbook chalks handy to remedy that problem.
There.

Now the room was coming together, but...oh that old, stained, linoleum floor.
Hmmmm...
Quick fix - peel and stick planks of wood (look) flooring.
Really it only took me an afternoon, and...
Ahhhh, much better.
But as long as we had the toilet pulled out to lay the floor,
Hmmmm...
It wouldn't really take much to replace it with one that had a fully glazed trap and did not have a weird brown mark in the top that the builders didn't seem to think was a problem.
(I didn't take a picture of that one... it's a toilet.)
Oh, and while I was at the store... they had doors on sale!
(have I mentioned yet that I am a.d.d.?)
Okay, that one was not a quick fix... but we've been meaning to replace all the icky fake-oak-slab doors for a while now.
So, 7 six-panel doors later...

Yes, better.
 Only now those shiny brass knobs were bothering me on the beautiful white doors.
Hmmmm...
It only took me four hours of internet searching to realize that at this point I was running out of budget. Luckily I had recently seen a blog about spray painting hardware in oil rubbed bronze paint. (Ah-ha!)
Quick fix - spray painted knobs... hinges... strike plates...and screws.
(Yeah, okay, that one took a while, too.)
Ahhhh.
Oh, and there's the shower curtain that I bought to go with the rug. Remember the rug? Yeah, I decided the floor was too pretty now to bother with the rug...
so I put it in the master bath instead.
Hmmmm...